- 黄金
- 315.95 黄金
效果展示

ox_lib的
lib.logger函数可以将数据发送到Datadog或Grafana Loki,来实现记录日志的功能。两家官方都有推出免费的方案,优点是不用自己搭建,省心方便,缺点就是存在各种限制,好在Grafana Loki支持自托管。
ox_inventory也是使用这一函数对物品操作来进行记录,那么本教程将手把手带你安装Grafana+Loki,并记录物品捡起、丢弃、交换等等操作。
基础知识
Grafana+Loki可以直接与FiveM服务器在一台主机上运行,同时也推荐你这样做。因为默认情况下,自托管Loki不会进行身份验证,需要依靠外部身份验证层,例如NGINX basic auth或Cloudflare Access,但如果是搭建在一台主机上,我们只需要禁止公网访问Loki的端口即可(Loki端口默认3100,一般云服务器都是拒绝公网访问所有端口,只放行特定的端口)。
然后我们需要知道Grafana、Loki、Promtail这三者的关系:
- Grafana:一个网页界面,可以对包括Loki在内的等等数据进行显示、筛选等等操作
- Loki:日志引擎
- Promtail:将日志发送给Loki
下载程序
前往https://grafana.com/grafana/download?edition=enterprise&platform=windows,下载Windows版本的Grafana安装程序。
下载完成后打开无脑下一步即可,此处可以选择安装位置。
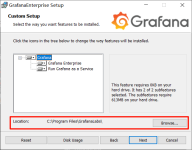
如果需要通过公网来访问Grafana,参考https://cloud.tencent.com/developer/article/2337875,开放3000端口的TCP。
前往https://github.com/grafana/loki/releases,下载最新版本、Windows系统的Loki和Promtail。
注意:不要下载 LogCLI 或 Loki Canary。LogCLI可以在命令行界面中运行 Loki 查询,Loki Canary是审计Loki性能的工具。我们用不到。
这两个才是我们需要的,如图。
前往https://raw.githubusercontent.com/grafana/loki/v2.9.4/cmd/loki/loki-local-config.yaml,下载对应版本的Loki配置文件。
在任意位置新建一个文件夹(建议还是在之前安装Grafana的文件夹里,如
C:\Program Files\GrafanaLabs\loki),命名为loki,并且将刚刚下载的三个文件放进去。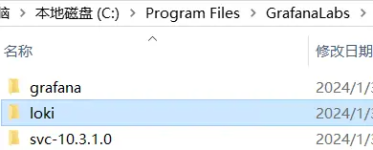
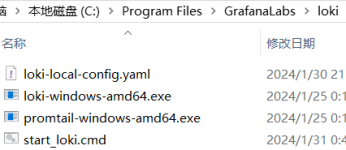
在loki的文件夹内新建一个文本文档,命名为
start_loki.cmd,内容为.\loki-windows-amd64.exe --config.file=loki-local-config.yaml,保存关闭。完成以上操作之后loki的文件夹应该长这样,如图。
启动程序
Grafana安装完后会自动作为服务,每次开机自动运行。Loki通过上面创建的
start_loki.cmd来启动即可。配置Grafana
登录
默认用户名和密码都是admin,登录进去后会提示你修改密码。设置中文
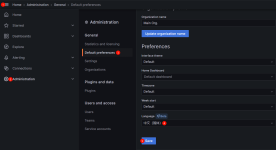
弹出提示选择
Save即可添加Loki为数据源
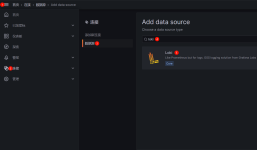
如图,连接地址填写http://localhost:3100,滚动到最下面点击
Save & test即可。
导入仪表盘
前往https://github.com/Cata-a1138/grafana-ox_inventory,下载仪表板模板。按下图操作后选择导入仪表板,选择之前下载的文件后点击
Import即可。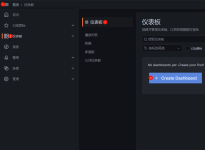
配置ox_lib和ox_inventory
在你的cfg中加入以下代码。
代码:
set ox:logger "loki"
set loki:user ""
set loki:password ""
set loki:endpoint "http://localhost:3100"
# 通过ox_lib记录库存日志(0:禁用,1:标准,2:所有包括AddItem、RemoveItem、商店购买)
set inventory:loglevel 1完成
现在进入游戏,扔掉物品试试看吧!本教程只是一本“启蒙书”,你可以在自己的插件中使用
lib.logger记录你想要的信息,或详细了解Grafana,对数据进行更多处理。参考文档

Technical documentation | Grafana Labs
Technical documentation for Grafana Labs products and services.
 grafana.com
Introduction - Overextended
Documentation for Overextended's resources for FiveM/RedM
最后编辑:


